Picanha

Don’t know what Picanha is? If you don’t live in South America, that’s not surprising.

It’s pronounced pick-AHN-yah – but that middle syllable should be pronounced using your nose.

Picanha is a staple of Brasilian steakhouses (properly referred to as churrascarias) across the world, and homes all across Brasil. When prepared properly, it’s more tender and much tastier than the best cuts of meat. The meat is leaner than Filet Mignon (but you’d never eat Picanha without the fat).

Where does it come from?

Picanha is known by a lot of names. “Picanha Cap,” “Sirloin Top Cap,” and “Rump Cap” are a few. It’s commonly sold a lot in the United States. It’s essentially the muscle next to the tail.

Photo from BBQ Star

Where to get it?

Almost every butcher has Picanha, they just may not realize it. It can come as part of a beef order for whole hindquarters. When the butcher cuts into the whole beef, they often discard this part of the meat, not realizing that they’re basically chucking the best part of the cow. People typically don’t buy it because of the fat cap (which, is the best part).

Here is an awesome video from Sous Vide Everything about how to butcher and trim a hindquarters properly to get the best Picanha cut. This will also help you recognize a good cut of Picanha roast.

It also shows how to slice up Picanha and cook it with a Sous Vide and a blow torch.

Local Butcher

I have to believe that a local butcher should be able to get this for you on request. Though, I’ve never done this myself.

Supermarkets

I discovered that one of my local supermarkets (Safeway, here in Northern California), has a butcher that actually knows how to cut Picanha. It goes on sale every few weeks. Even if there’s none available, I can call in and make a request for it in the morning, and they will cut a fresh roast off for me and have it ready in the afternoon.

It really helps to have a good relationship with a local butcher, even at a supermarket.

Online

Lots of online places have really good Picanha. Personally I’ve used Butcher Box, and they always have great meat. Butcher Box calls their Picanha “Sirloin Top Cap.” It always comes in whole roasts, as it should be.

What to Buy

Always buy the whole roast. Don’t let someone slice up your Picanha for you, unless they know what they’re doing and you’re going to eat it the same day. Slice it yourself, when you’re ready.

Picanha
Photo from Frankie’s Free Range Meat

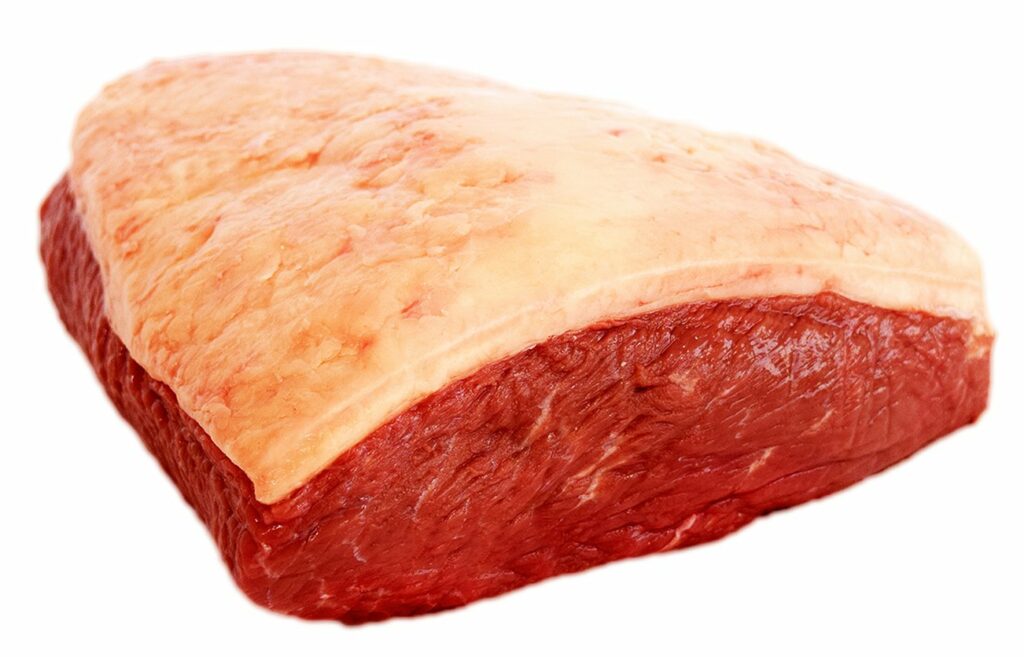
You want a pretty even fat cap on the top of it. The fat cap should be ½” – ¾” thick.

Preparation

We’re going to talk a little bit here about how to prep Picanha to cook as a steak. Alternatively you could cook it on a skewer, but I’m not going to cover that. If you’re interested in skewers, see this Guga Foods video on YouTube, which covers both steak and skewer prep.

Directions

  • Slice 1″-1 ½” steaks with the grain
    This allows cutting the meat against the grain when eating. The Guga Foods video does a pretty good job of explaining why to cut with the grain. Slice with the fat side down, because the fat is a little harder to cut through and you don’t want to squish the flesh trying to cut through the fat on the top.
  • Season with rock salt only
    Don’t use anything else — no pepper, granulated garlic, or secret spice mix. Salt. Only. Period. I use Sal Grosso Thick Barbecue Salt. This stuff is the best, and you only need very little of it. If you don’t have rock salt handy, kosher salt also works. The Himalayan stuff also will be “fine” – but only as a last resort.
  • Rest for 30 minutes at least
    Use this time to turn on your grill and get it heated up.
  • Preheat the grill on High
    As hot it will go. Like surface of the sun hot.
  • Put the steaks on the grill. Close the lid
  • Pay close attention. The fat cap will start to cook and drip fat onto the grill, which could start a fire in the grill. You’ll want to make sure to flip them – maybe wear gloves to protect your hands. Here’s a slow-mo video of me cooking Picanha:
  • Cook until your desired doneness. Picanha is great when it’s medium, but it’s also good at all other doneness. Thicker pieces will be hard to cook it more rare than medium without leaving the fat cap undercooked. Make sure the fat is seared.

The Reverse-Sear

This “super hot and super fast” approach might not be for everyone. Another option would work well if you’re able to create hot and cool zones on your grill.

Directions

  • Follow steps 1-3 above
  • Heat the hot side of the grill only – no flame on the cool side
  • Put the steaks on the cool side and close the lid. The flame from the hot side will heat up the cool side and cook the steak without flare-ups, allowing you to have better control of the cook
  • Tend to the steak, flipping as needed until just before your desired doneness
  • The steak still needs to be finished hot and fast, with direct flame. Move the steaks to the hot side and close. Flare ups should happen quickly – so be ready to flip after a short time and then remove from the grill

Cutting

Cut against the grain. The pieces should be ¼” – ½” thick, and should have a small piece of fat cap on each piece. Eat the whole piece! If you really can’t stand eating the fat (together with the beef), go ahead and cut it off, but leave a little bit of meat on the fat so that you can give it to someone who will eat it and appreciate it for all of it’s goodness and wonder.

White Rice

Let’s get one thing out of the way. I don’t like rice cookers. You won’t find anything on this site about how to make rice in a rice cooker. I don’t have room for it in my kitchen. I haven’t tasted any rice-cooker-born rice that tastes better than my rice that comes from a saucepan. Not saying it’s not out there – it’s just not for me.

Lots of people have their own way of making rice. Rice cooking varies depending on the type of rice, the elevation, the type of water, presence of a rice cooker, and lots of other things too.

I too, have found my own way to make rice. I’m sure other people make it the same way I do. I don’t claim this to be my own recipe – this is the way my Dad taught me how to make it, though I’m not sure he remembers doing so. I’ve evolved my take on it along the way – adding opportunities for flavoring the rice depending on your taste or your mood.

Equipment

Medium Saucepan, with a lid

It could be large, or small, depending on how much rice you want to make. I have never tried this with anything but a non-stick or stainless steel saucepan, but I’m sure other types would work

Measuring Cup

I like the Pyrex Prepware 2-Cup Measuring Cup https://amzn.to/3cxyEMr – $13.23 at the time of this writing. There are 1-Cup and 4-Cup versions, or use your own.

Ingredients

  • 2 Cups Long Grain Rice

  • 3 Cups Water

  • 1 Tablespoon Salted Butter

The Magic Rice Ratio

This is the key to the whole thing. The recipe should contain two parts rice to three parts water. If you stick with that ratio, the rice should turn out tasty and fluffy.

Directions

  • Put the saucepan on the cooktop and turn to medium heat
  • Add butter. Melt the butter in the bottom of the saucepan
  • Before the butter starts to brown (or sizzle), add the rice
  • Stir the rice and butter together. You’ll hear the butter start to sizzle. We’re trying to “toast” the rice here so it changes color just a little bit. Not too much though, and not all the rice
  • Add the water. I usually just refill the measuring cup with water
  • Stir the water and the rice together and bring the water to a super-light boil. Barely showing bubbles. If you go to a rolling boil, you’ve gone a little bit too far. Don’t fret, just move on to the next step
  • Lower the burner to simmer. Put the lid on the saucepan, even if it’s boiling like crazy. Turning the heat down will fix that…later
  • Ask Siri, or Alexa, or Cortana, to set a timer for 20 minutes. Or use your your microwave, kitchen timer, or sun dial
  • When the time is up, turn the burner off. Remove the saucepan from the burner
  • Take off the lid and stir the rice making sure to scrape the bottom and sides. Put the lid right back on and let sit for five more minutes
  • Boom. Rice is done, Enjoy

Flavoring Opportunities

Tired of plain white rice? Do you want to spice it up, change the flavor, rock your world? Here are some ideas.

You Love Butter

Butter is tasty. If one tablespoon doesn’t do it for you, up the amount to two or three. But, I would not recommend the number of tablespoons of butter exceeding the number of cups of water.

Add Spices

At the point where you combine the rice with butter, add some spices to the mix. Personally I like to add garlic salt. Bouillon cubes work great too. Don’t go too heavy though – remember that the butter is salted, so that will handled some of the saltiness. Start with small quantities of spice and work your way up.

Alternatives to Water

The recipe calls for three cups of water. But really, it only needs to be a liquid that can properly hydrate the rice. Sometimes I swap out water for Beef or Chicken Stock. When I make Butter Chicken (recipe coming soon), I replace about ¼ cup of water with butter chicken liquid when mixing the water and rice together. If you’re adding something oily or fatty, you’ll want to maybe remove a little less water than a 1:1 ratio.

Homemade Greek Yogurt

Homemade plain greek yogurt has transformed my diet. It’s easy to make, lasts a long time, and (at least for me) is a great replacement for ice cream as an after-dinner snack. The instructions are simple, albeit time-consuming. But once you get them down, it’s easy to make awesome yogurt every single time!

Disclaimer: I’m not a chef or a scientist or a doctor. I don’t know about food bacteria and things. This is the recipe I follow, and it does well for me.

Equipment

Sous Vide

AKA “Immersion Circulator.” I use an “Anova” brand. There are lots out there. If you’re buying one, I would make sure you get one that you can change the temperature without your phone. Lots of them are “phone only” to operate. 

Water Bath Container

This is like a big pot or plastic container, used to mount the sous vide and hold the water bath. I use a commercial food storage plastic container. You need one that is deep enough so that the water bath waterline goes higher than the sous vide minimum water level. I use this https://amzn.to/2Ti6TiJ. The bigger the size, the more yogurt that you can make. I use the 22 Qt ($31) to fit my yogurt container. If you want less yogurt, the 8 Qt ($12) is a good size.  

Yogurt container (glass or plastic)

Something like a ball jar or a narrower food safe container that can fit inside your water bath container with the sous vide mounted. For ~1 gallon of yogurt, you need 2 gallons of milk, so I use a Cambro 8 quart food safe round container with a lid. https://amzn.to/2ZbMkIy $4.99 (lid sold separately: https://amzn.to/3fZUpWF $5.68). 

Straining towel

Any thin kitchen towels will work. I use a “Flour Sack Towel” https://amzn.to/3dVxR7C ($25 for 12) – These are reusable. I just rinse out, wash in the washing machine, and dry on a line or in the dryer without a dryer sheet. 

Ingredients

  • 2 Gallons Organic Pasteurized Whole Milk, (not Ultra-Pasteurized)

  • ½ Cup Plain Full Fat Yogurt
    (If I don’t have some from a previous batch, I use Fage 5%)

Directions

  • Pour the milk into the Yogurt container. Put the lid on. If a screw lid, just slightly tight
  • Mount the Sous Vide into the water bath container
  • Place the water bath container on top of a trivet. This prevents heat transfer to your counter or tabletop
  • Place the Yogurt container into the water bath container, centered so that there is space for water all around
  • Fill the water bath container with water, around the yogurt container. Important that the waterline is *above* the milk line. Warning: the yogurt container may float. Fix this by putting a heavier thing on top of it, like a few bowls, to weigh it down
  • Place the water bath container somewhere it can sit for a long time, and is near to power
  • Set the sous vide to 110°
  • When the water temp gets to 110°, the sous vide should tell you. Keep the water at this temperature for at least 13 hours (I have done this up to 18 hours before). Some sous vides have a timer that will do this for you, or you can just use your own timer
  • Turn off the sous vide. Remove the yogurt container, dry off, and store in fridge at least 6 hours
  • While yogurt container is in the fridge, unmount the sous vide and dump out the water bath. Attach the towel to the top of the water bath container forming a “bowl” to pour in the . I just use binder clips
  • After the yogurt has chilled, dump it into the towel so that the whey starts soaking through the towel and into the water bath container. Strain for 1-4 hours, stirring every hour or so to “scrape” the towel and allow thinner yogurt to mix closer to the towel. Cover with another towel or the lid of the Water Bath Container to prevent dust
  • When the yogurt is done straining, about 40-50% of the milk volume will have strained into the bottom of the Water Bath Container as whey – a greenish clearish byproduct of the milk. Use a large spoon to move the remaining yogurt in the towel to a tupperware or container for refrigerator storage

Tips

Sour-er Tasting Yogurt

If you prefer more sour tasting yogurt, strain out less whey. If you prefer less sour tasting yogurt, strain more. I find that the 40-50% ratio is not very sour at all. You can always store the strained whey in another container and add it back later to add sourness. 

The Next Batch

Immediately fill a small tupperware or ziploc bag with ~½ cup of your yogurt into the freezer to use for your next batch. It can go into the batch frozen. It will heat up during the process. This will come in handy if you eat all of your yogurt and forget to use some in the next batch!

Common Questions

My yogurt is completely still liquid after I’ve refrigerated it

This is likely because there was an issue with the bacteria from the original full fat yogurt that was added during the cooking process. I know this happens to me most of the time when I’m making a new yogurt batch out of my previous yogurt that I’ve kept in the freezer for too long. All you can do here is toss it and try again with a fresh start.

I mistakenly let my yogurt cook for way more than 13 hours

This is all good. I’ve never done 24 hours, but I frequently leave it in the Sous Vide bath for ~18 hours. It should be fine.